How to Screenshot on a Mac: The Ultimate Guide
Stuck trying to grab that perfect image on your Mac? Taking a screenshot Mac is easier than you think. This guide covers everything from basic screen captures to tricks you probably didn't know existed. We'll even look at some helpful third-party tools. Ready to become a screenshot Mac pro?
If you have a Mac, you should consider how to capture the image you desire. Then, you can keep a record of your work and save the images for later.
Read on for some tips and tricks to take screenshots on macOS.
|
Fast charges all Apple and Android devices. Charges up to 50% from 0% in 20 minutes. Increases battery lifespan by producing less heat than standard chargers. Automatic shutoff protects your device from overcharging. Shop Now |

Key Takeaways
- Mac screenshots made easy: Use keyboard shortcuts like Command-Shift-3 (full screen), Command-Shift-4 (selection), and Command-Shift-5 (window or menu) for quick and easy image capture. Add Control to these shortcuts to copy directly to your clipboard.
- Customize your workflow: The Screenshot app (Command-Shift-5) offers powerful options for file management, including saving location, timers, and screen recording. Explore these settings to tailor the process to your needs.
- Annotate and share efficiently: Edit screenshots directly within the preview thumbnail for quick annotations. Consider third-party tools for advanced editing and convenient cross-device syncing.
Grab a Full-Screen Mac Screenshot
The easiest method to take a screenshot on your Mac is to capture the entire screen. You'll need to press the Shift, Command, and the number 3 key to produce an image.
Depending on your settings, you may see a preview of the screenshot. If so, you can click on it to view the image and make sure it looks good, and you'll know if you want to take a new screenshot.
Capturing the whole screen is nice because you can then crop the image to remove what you want. It's also quicker than some of the other options for taking screenshots on your computer.
Fortunately, this and the other methods work whether or not you're charging your computer.
How to Screenshot Part of Your Mac Screen
Perhaps you want to take a screenshot but not of your entire screen. You can control what part of your screen you include in the screenshot, but it will take an extra step.
At the same time, press Shift, Command, and the number 4 key. You'll bring up a crosshair that you can move around just like your mouse pointer, so you'll move it to where you want the screenshot to start.
Click on your mouse button or trackpad, and drag the cursor to the opposite corner of the selection area. Then, release the cursor to produce the final image.
As with the other method, you may see a preview that you can click on. Confirm that you captured what you want, and retake the screenshot or edit it as necessary.
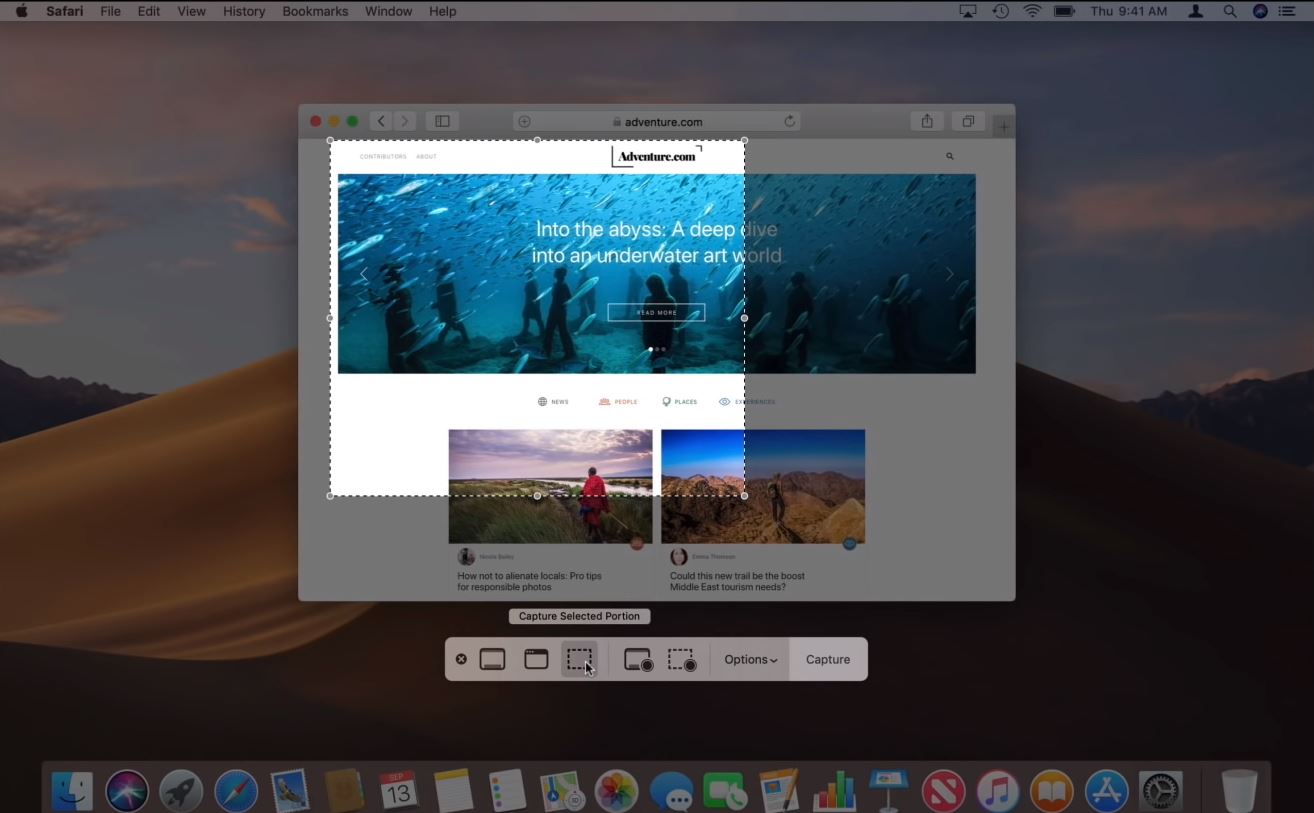
Screenshot a Specific Mac Window
A more specific way to screenshot a portion of the screen is to screenshot a specific window, such as Safari. First, you'll need to make sure the window you want to screenshot is in front of the other windows you have open.
Simultaneously press Shift, Command, and the number 5 key, and this will bring up a selection window. You can edit the size of the window, or you can click on the space bar to bring up a camera icon and screenshot the entire window.
Click on Capture near the bottom of the screen to take the screenshot. Before that, you'll have the option to adjust your settings, so you can choose where those screenshots are saved and if you want to add a timer.
When you see the camera icon, you can also press the escape key if you want to cancel the screenshot.
As with other methods, you might see a preview in the corner of your screen. You can click on it to bring up the full image and edit the screenshot or trash it if you want to take a new one.
Can You Screenshot *Any* Mac Window?
Unfortunately, you might not be able to use this method to screenshot any app on your Mac. According to Apple, you can't take screenshots of the Apple TV window, for example.
Other apps might also restrict the ways you take screenshots. However, you can take a screenshot of the entire image on your Mac, and you can open the screenshot to edit it.
Then, you'll be able to crop out other windows outside of the window you want to capture.
Handling App Restrictions on Screenshots
While the methods described above work in most situations, some apps might have restrictions on taking screenshots due to digital rights management (DRM) or other security measures. This is often the case with streaming services or apps that handle sensitive financial information. If you’ve tried to take a screenshot and only see a black screen or a notification that screenshots are disabled, there are still a few things you can try.
As mentioned, capturing the entire screen and then cropping the image is a reliable workaround. This lets you grab the content you need, even if the app itself blocks direct screenshots. You can use the Preview app (already on your Mac) or another image editor to crop the image.
If you frequently need screenshots from a specific app that restricts them, consider contacting the app’s developer. They might offer alternative ways to capture the information you need or address the issue in a future update. Speaking of keeping your devices ready for action, KEUTEK offers a range of portable power solutions to keep your Mac charged and ready for capturing those important screenshots, wherever you are.
Need Options for Mac Screenshots?
Using Shift, Command, and 5 is a great choice if you want to adjust some screenshot settings. You can choose to screenshot the entire screen, a window, or a portion you select.
When it comes to selecting a portion of the screen, you can be more precise than by dragging the cursor yourself. You'll get to see the selection area before you finalize it and take the shot.
The menu also includes options for screen recordings, so you can take a video. As with the standard photo option, you can choose to record your entire screen or a part of it.
You'll also want to use this method to bring up your screenshot settings. If you don't see a preview of your screenshots like you would on an iPhone, you'll click on Options, then Show Floating Thumbnail.
Using the Screenshot App (Command-Shift-5)
If you take screenshots often, consider using the Screenshot app. Open it by pressing Command-Shift-5. This brings up a small menu at the bottom of your screen with a few options.
You’ll see buttons to capture the entire screen, a window, or a selection. You’ll also see options to record the entire screen or a portion of it. Click on Options to adjust a few settings. This method is useful for more control over your screenshots and recordings. You can change where files save or set a timer.
The Screenshot app is especially helpful when using accessories like drawing tablets. For example, if you're using your Mac with a XP-Pen Deco Pro, precise screen captures for your artwork become much easier.
Setting a Timer
The Screenshot app lets you set a timer. This is helpful if you need to arrange windows or get something ready before taking the image. You can choose between five or ten seconds.
Showing the Mouse Pointer
Another option within the Screenshot app is showing the mouse pointer. This is useful if you’re creating a tutorial and want people to know where to click. You can also use it to highlight something specific on the screen.
Remembering the Last Selection
If you frequently take screenshots of the same area, tell your Mac to remember your last selection. This way, you won’t have to re-select the same area every time. This can save you time and effort.
Screen Recording Options
The Screenshot app also lets you record your screen. Choose to record the entire screen or just a portion, similar to taking a still image. This is helpful for creating a video tutorial or recording a presentation. You can even pair this with high-quality audio recording equipment, like a Blue Yeti microphone, for professional-grade video tutorials.
Command-Line Screenshot Tool (screencapture)
If you're comfortable using the command line, you can use the screencapture command in Terminal. This offers more advanced options and control. Check out this guide on using screencapture to learn more. While it’s not for everyone, it can be a powerful tool for specific needs.
How to Screenshot Your Mac's Touch Bar
If your Mac has a touch bar, you can also take a screenshot of that. You'll want to press the Shift, Command, and 6 keys at the same time.
The touch bar offers a ton of uses, and you can change what shows up. Because of that, you might want to remember what the bar is showing at a specific point.
Pressing the correct keys together will take an image of your current touch bar. It will save to your desktop or wherever you've set your screenshots to go.
|
Fast charges all Apple and Android devices. Charges up to 50% from 0% in 20 minutes. Increases battery lifespan by producing less heat than standard chargers. Automatic shutoff protects your device from overcharging. Shop Now |
Copy Your Mac Screenshot to the Clipboard
If you want to take a screenshot to send to someone, you don't have to save it to your computer. Instead, you can add the control key to the steps you use to capture a full screen or partial screen image.
To copy the full screen to your keyboard, you'll press the Shift, Command, Control, and 3 keys at once. You can swap out the 3 key with the 4 key to select the area to screenshot.
After that, you'll be able to paste the screenshot wherever you want. That way, you don't have to search for your screenshot if you want to add it to an email or another message.
Keyboard Shortcut for Copying to Clipboard
Want to skip saving the screenshot to your desktop? You can copy a screenshot directly to your clipboard, ready to paste into an email, message, or document. Just add the Control key to the usual screenshot shortcuts. For a full-screen capture, press Shift, Command, Control, and 3 simultaneously. To select a specific area, press Shift, Command, Control, and 4, then drag your cursor to define the capture area. This small tweak can save you time and keep your desktop clutter-free. For more detailed instructions and tips on Mac screenshots, check out our ultimate guide.
Where Are My Mac Screenshots?
If you don't want to copy a screenshot to your clipboard, you should know where to find it. The default storage location is your desktop, so you shouldn't have to look too hard.
That setting is also useful if you include your desktop files in iCloud. You'll be able to access your screenshots on your phone if you need to text someone the images.
If you want to change the default location, you'll want to select Shift, Command, and 5. Pull up the Options menu, and review the different places, such as Desktop, Documents, Clipboard, Messages, Mail, and Preview.
You can choose the location you prefer so that you don't have to move screenshots around all of the time.
Other Places to Find Screenshots
Computers with macOS Mojave or newer versions can also save to other locations. You can use this option to store your screenshots if you don't want to clutter your desktop or another file location.
To set this up, you'll use the steps for changing the default location. Click on Other Locations... to bring up your file system, and you can look for the folder you want.
For example, you might create a specific folder that you title Screenshots.
Using Finder to Locate Screenshots
Even if you customize your screenshot location, you can always use Finder to locate your files. Open Finder, and think about where you saved your screenshots. If you chose the default location, they’ll be on your desktop.
If you selected another folder, either through the Options menu or “Other Location,” use Finder to find the folder. Type the folder name into the search bar, and your Mac will show you matching files and folders.
You can also use Finder to search for specific screenshots if you remember the file name. Screenshots automatically use the date and time as the file name, so you might find the image you’re looking for if you remember when you took it. This is especially helpful if you back up your screenshots to iCloud and want to see them on a different device.
If you’re struggling to remember the exact file name, use a partial name to search. For example, if you know you took the screenshot on October 26th, type “Screen Shot 2024-10-26” into the search bar. Finder will show you all files that begin with that text string. This can be a lifesaver when you need to quickly find a specific image, especially if you use screenshots often for work or personal projects, like documenting the setup of your new KEUTEK car charger.
Annotate Your Mac Screenshots Like a Pro
One of the benefits of the Show Floating Thumbnail setting is that it makes it easy to open and edit your images. You can click on the screenshot preview on your screen.
Then, you'll bring up the full image and a menu of options. You can add text, lines, and shapes, and you can choose from different colors to make your annotations stand out.
Editing the screenshot this way is useful for pointing out specific things. For example, you might highlight data points if you need to email the screenshot to a client or boss.
Change Your Mac Screenshot Image Format
Your Mac will automatically save all screenshots as PNG files. However, PNG files can be a bit large, so they can quickly use up space that you might want to save for other files.
But if you don't want to delete all of your screenshots, you can change their default format. Open Launchpad, then Other, then Terminal to bring up a box of code. Add the following to the box:
defaults write com.apple.screencapture type jpg
Restart your computer to officially change the default format to JPG, which is smaller than PNG. Then, you can take more screenshots while saving space on your device.
Default File Format and Naming
Your Mac automatically saves screenshots as PNG files. These files offer high quality, which is great for capturing lots of detail. The naming convention is also pretty straightforward. You'll find them labeled as "Screenshot [date] at [time].png," making them easy to identify and sort. If you’re taking multiple screenshots, they’ll be numbered sequentially, so you won’t lose track.
File Size Considerations: PNG vs. JPG
While PNGs are great for quality, the file size can be a drawback. They tend to be larger than other image formats like JPG, which can eat up storage space, especially if you take a lot of screenshots. This might be a concern if you use a MacBook Air with limited storage.
If you find yourself running low on storage, or if you’re sharing screenshots online, consider switching to JPG. JPGs offer a good balance between image quality and file size. They’re generally much smaller than PNGs, making them ideal for emailing or uploading to the web. You can change the default screenshot format from PNG to JPG through your Mac’s terminal. Instructions for changing the default file type are readily available online. This can help you save valuable space without sacrificing too much image quality.
Third-Party Mac Screenshot Tools
Apple offers a variety of built-in screenshot methods and settings. However, if you want more flexibility, you can look into a third-party screenshot app.
Some apps are free, while others cost a bit of money. These other screenshot apps can help you adjust the size of your screenshots more easily.
You'll also find the app Snappy works on your Mac and your iPhone. That way, you can sync all of your screenshots and store them together.
|
Fast charges all Apple and Android devices. Charges up to 50% from 0% in 20 minutes. Increases battery lifespan by producing less heat than standard chargers. Automatic shutoff protects your device from overcharging. Shop Now |
Advanced Editing Options
One of the best parts of the Show Floating Thumbnail setting is how easy it makes opening and editing your images. Just click the preview that pops up on your screen. This opens the full image along with a handy menu of editing options. You can add text, lines, and shapes, and even choose different colors to make your annotations stand out. This makes it super clear and easy to highlight important info. Imagine needing to email a screenshot to a client or your boss—you can quickly point out specific data or areas they should focus on, saving everyone time and potential confusion. Learn more about taking screenshots on a Mac.
What's the Best Way to Screenshot on *Your* Mac?
When you use a Mac, you get access to multiple keyboard shortcuts to take a good screenshot. You can capture the full screen or a portion of it.
Plus, you'll get to choose where to save your screenshots and if you want to edit them. All of that can come in handy when you're working and need to send or save an image.
Do you want a good fast charging cable for your Apple devices? Check out our 60W fast charging cable bundle.
Related Articles
- How to Take a Screenshot on Your Mac: The Ultimate Guide
- Apple Is Replacing All Butterfly Keyboards For Free
- The 15 Best iPhone Hacks, Tips, and Tricks for 2022
- Hottest Apple Products Coming in 2020
Frequently Asked Questions
Can I change where my Mac screenshots are saved? Yes! By default, screenshots save to your desktop. However, you can change this. Press Shift-Command-5 to open the Screenshot app. Click "Options," and you'll see a list of locations like Documents, Clipboard, Mail, Messages, and Preview. You can also choose “Other Location” to select any folder on your Mac.
My screenshots are PNGs. Can I change the file type? While the default is PNG, you can change the format to JPG. Open Terminal (found in Applications/Utilities or via Spotlight search) and enter this command: defaults write com.apple.screencapture type jpg. Then, restart your computer. JPGs are generally smaller files, which can help save storage space.
Are there any limitations to the built-in screenshot tools? While the built-in tools are versatile, some apps, particularly those with DRM protection (like streaming services), may block screenshots. If this happens, try taking a screenshot of your entire screen and then cropping the image to just the area you need.
What if I need more advanced screenshot features? If the built-in tools aren't enough, consider third-party screenshot apps. Many offer features like scrolling screenshots, custom hotkeys, and advanced editing tools. Some are free, while others are paid, so you can explore and find one that fits your needs and budget.
Can I annotate my screenshots directly on my Mac? Absolutely! Enable the "Show Floating Thumbnail" option in the Screenshot app (Shift-Command-5 and then click "Options"). After taking a screenshot, a small preview appears in the corner of your screen. Click it to open a quick editing window where you can add text, shapes, highlights, and more. This is perfect for adding context or highlighting important details.


Leave a comment